needflow
Added in version 0.2.0.
needflow creates a flowchart of filtered needs.
If you provide an argument, we use it as caption for the generated image.
Example 1
.. needflow:: My first needflow
   :filter: is_need
   :tags: flow_example
   :link_types: tests, blocks
   :show_link_names:
   :config: lefttoright

Added in version 3.0.0: You can now also set all or individual needflow directives to use the Graphviz engine for rendering the graph, which can speed up the rendering process for large amount of graphs.
See the needs_flow_engine configuration option and the directive engine option for more information.
Using Graphviz engine

My first needflow
Dependencies
plantuml
needflow, with the default plantuml engine, uses PlantUML and the
Sphinx-extension sphinxcontrib-plantuml for generating the flows.
Both must be available and correctly configured to work.
Please read install plantuml for a step-by-step installation explanation.
graphviz
needflow, with the graphviz engine uses the Graphviz dot executable for rendering the flowchart,
and the built-in sphinx.ext.graphviz extension from Sphinx.
See https://graphviz.org/download/ for how to install Graphviz,
and sphinx.ext.graphviz for configuration options.
In particular, you may want to set the graphviz_output_format configuration option in your conf.py.
Options
Note
needflow supports the full filtering possibilities of Sphinx-Needs. Please see Filtering needs for more information.
Some further options are accepted only for ubCode compatibility, and are otherwise ignored.
engine
Added in version 3.0.0.
You can set the engine to use for rendering the flowchart,
to either plantuml (default) or graphviz.
alt
Added in version 3.0.0.
Set the alt option to a string to add an alternative text to the generated image.
If the option is not set, the graphviz engine describes the image as
needflow graphviz diagram.
Set the option to an empty value to publish an empty alternative text instead,
for a diagram that is purely decorative.
root_id
Added in version 3.0.0.
To select a root need for the flowchart and its connected needs, you can use the :root_id: option.
This takes the id of the need you want to use as the root,
and then traverses the tree of connected needs, to create an initial selection of needs to show in the flowchart.
Connections are limited by the link types you have defined in the :link_types: option,
or, if not defined, every link type but the summary ones (link_types).
The direction of connections can be set with the :root_direction: option:
both (default), incoming or outgoing.
If :root_depth: is set, only needs with a distance of root_depth to the root need are shown.
Other need filters are applied on this initial selection of connected needs.
Example 2
.. needflow::
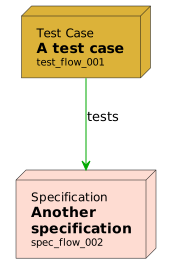
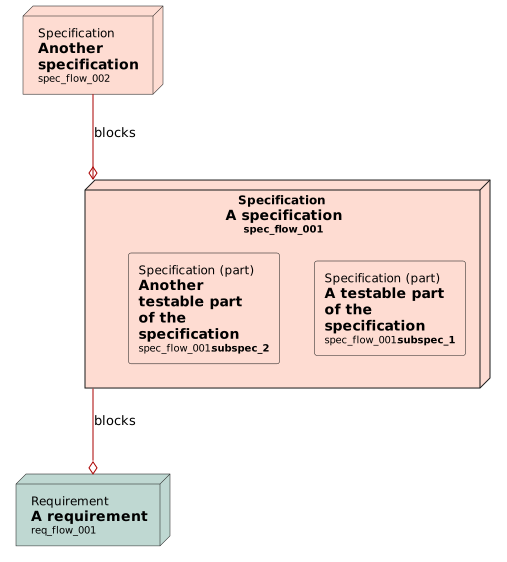
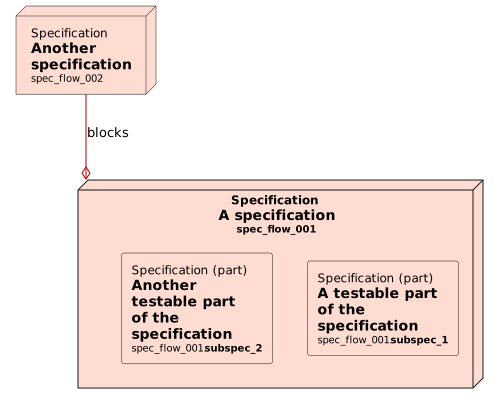
   :root_id: spec_flow_002
   :root_direction: incoming
   :link_types: tests, blocks
   :show_link_names:

.. needflow::
   :root_id: spec_flow_002
   :root_direction: outgoing
   :link_types: tests, blocks
   :show_link_names:

.. needflow::
   :root_id: spec_flow_002
   :root_direction: outgoing
   :root_depth: 1
   :link_types: tests, blocks
   :show_link_names:
Using Graphviz engine


show_filters
Adds information of used filters below generated flowchart.
Example 3
.. needflow::
   :tags: flow_example
   :show_filters:

Used filter: tags(flow_example)
Using Graphviz engine

Used filter: tags(flow_example)
show_legend
Changed in version 8.4.0: Takes the name of a legend configuration. Written bare it still draws the legend it always drew, so no existing diagram changes.
Describes the diagram: its need types, its link types, or both.
Written without a value, the engine chooses:
.. needflow::
   :show_legend:
Both engines draw their own in-image legend for that, exactly as they always have –
including the long-standing difference that plantuml lists every configured need type
while graphviz lists only the ones it drew.
That difference is deliberately left alone, so no existing diagram changes;
a named legend is how a project gets the same legend on both.
A project can also change what “bare” means, with needs_flow_show_legend.
Example 4
.. needflow::
   :tags: flow_example
   :show_legend:

Using Graphviz engine

Written with a value, it names an entry of needs_flow_legends:
needs_flow_legends = {
    "beside": {"parts": ["types", "links"], "placement": "external"},
}
A legend placed beside the diagram lists only what the diagram actually drew,
whichever engine drew it,
and shows its sections in the order parts gives them.
Example 5
.. needflow::
   :tags: flow_example
   :show_legend: beside
Color |
Type |
|---|---|
#BFD8D2 |
Requirement |
#FEDCD2 |
Specification |
#DCB239 |
Test Case |
Link |
Description |
|---|---|
|
blocks |
|
tests |
|
links outgoing |
Using Graphviz engine
Color |
Type |
|---|---|
#BFD8D2 |
Requirement |
#FEDCD2 |
Specification |
#DCB239 |
Test Case |
Link |
Description |
|---|---|
|
blocks |
|
tests |
|
links outgoing |
The option takes a name and never the sections inline.
A project names its legends whatever it likes,
so a legend called types would collide with the section called types
and need a precedence rule nobody should have to learn.
One namespace, no reserved words.
Which legend a diagram gets is resolved in order: the name this option gives, then needs_flow_show_legend, then the engine’s own legend.
Naming a legend that needs_flow_legends does not define is a warning on that diagram, listing the names that are available. The name is then treated as though it had not been written, so the project default still applies – a typo in one diagram does not cost the project the legend it configured.
show_link_names
Added in version 0.3.11.
Changed in version 8.4.0: Takes an optional value.
Written bare it still means outgoing, which is what the flag has always drawn,
so no existing document changes.
Chooses what each connection is labelled with:
noneNothing (the default).
outgoingThe outgoing title of the link type, e.g.
links outgoing.incomingThe incoming title of the link type, e.g.
links incoming.typeThe bare link field name, e.g.
links, for a diagram that wants the data model rather than prose.
Written without a value, :show_link_names: means outgoing:
.. needflow::
   :show_link_names:
You can set the project default with needs_flow_show_links in conf.py.
Because the option now takes a value rather than only being present or absent,
a single diagram can turn labels off again with none,
which the bare flag could not express.
Example 6
.. needflow::
   :tags: flow_example
   :show_link_names: incoming

Using Graphviz engine

link_types
Added in version 0.3.11.
Defines the link types to show in the needflow. Must contain a comma separated list of link type names.
.. needflow::
   :link_types: links,blocks
By default, we show every link type but the summary ones (summary = true in needs_links):
a summary link is a shortcut across the trace (Summary link types), so drawing it beside the links it shortcuts
would show every path twice; it is drawn only where it is named here.
Changed in version 9.2.0: A summary link type is left out of the default.
An identical link can show up twice in the generated needflow, if the copy
option of a specific link type was set to True.
In this case, the link_type “link” also contains the copies of the specified link_type and therefore
there will be two identical connections in the needflow.
You can avoid this by not setting “links” in the link_type option.
You can set this option globally via the configuration option needs_flow_link_types.
See also needs_links for more details about specific link types.
Example 7
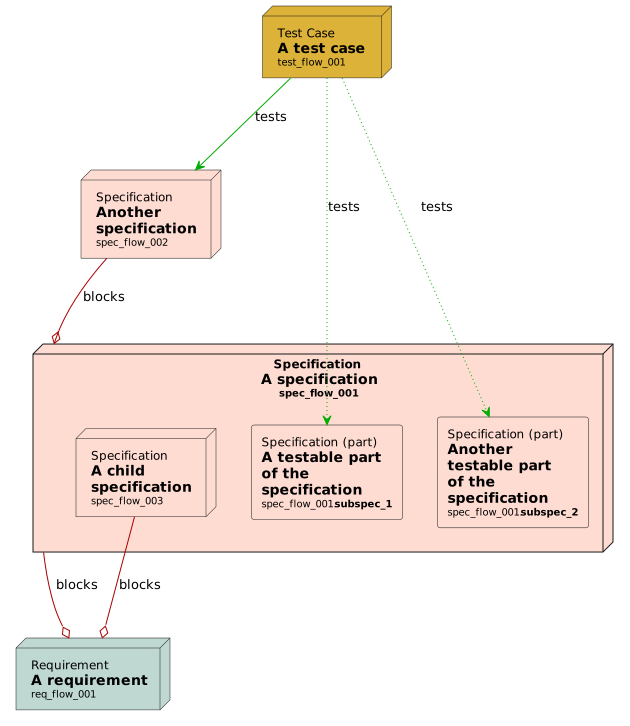
.. req:: A requirement
   :id: req_flow_001
   :tags: flow_example

.. spec:: A specification
   :id: spec_flow_001
   :blocks: req_flow_001
   :tags: flow_example

   :need_part:`(subspec_1)A testable part of the specification`

   :need_part:`(subspec_2)Another testable part of the specification`

   .. spec:: A child specification
      :id: spec_flow_003
      :blocks: req_flow_001
      :tags: flow_example

.. spec:: Another specification
   :id: spec_flow_002
   :links: req_flow_001
   :blocks: spec_flow_001
   :tags: flow_example

.. test:: A test case
   :id: test_flow_001
   :tests: spec_flow_002, spec_flow_001.subspec_1, spec_flow_001.subspec_2
   :tags: flow_example

.. needflow::
   :tags: flow_example
   :link_types: tests, blocks
   :show_link_names:
Using Graphviz engine

direction
Added in version 8.4.0.
Sets the direction the diagram flows in:
down (the default), up, right or left.
The tokens TB, TD, BT, LR and RL are accepted as aliases,
so a habit picked up from Graphviz or Mermaid does not have to be unlearned.
You can set the project default with needs_flow_direction in conf.py.
Not every engine can draw every direction.
PlantUML has no bottom-up or right-left layout at all,
so up is drawn down and left is drawn right,
with one warning per project;
Graphviz draws all four.
A diagram is never refused for asking:
a plainer diagram is better than a failed build.
An explicit :direction: also wins over a layout that the :config: it is written
beside happens to set.
The config is a preamble of defaults and the option a per-element value,
which is the precedence both engines already give them;
where the two disagree the option is used and the disagreement is reported.
Example 8
.. needflow::
   :tags: flow_example
   :link_types: tests, blocks
   :direction: right

Using Graphviz engine

config
Added in version 0.5.2.
You can specify a configuration using the :config: option but you should
set the needs_flow_configs configuration parameter in conf.py,
when using the plantuml engine,
or the needs_graphviz_styles configuration,
when using the graphviz engine.
Example 9
.. needflow::
   :filter: is_need
   :tags: flow_example
   :types: spec
   :link_types: tests, blocks
   :show_link_names:
   :config: monochrome
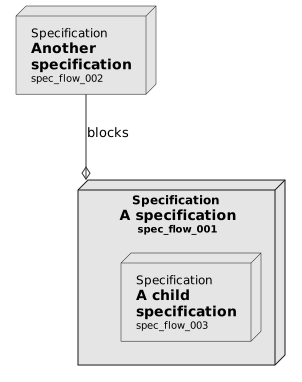
You can apply multiple configurations together by separating them via , symbol.
Example 10
.. needflow::
   :filter: is_need
   :tags: flow_example
   :types: spec
   :link_types: tests, blocks
   :show_link_names:
   :config: monochrome,lefttoright,handwritten
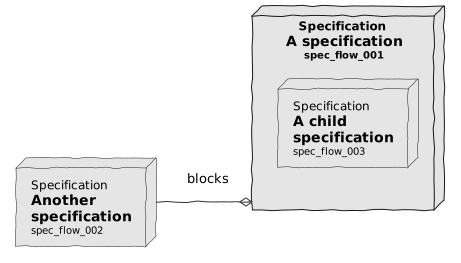
Using Graphviz engine

Sphinx-Needs provides some necessary configurations already.
For needs_flow_configs they are:
config name |
description |
|---|---|
mixing |
Allows mixing of different PlantUML diagram types (e.g. Class and Deploy diagrams) |
monochrome |
Changes all colors to monochrome colors |
handwritten |
All lines look like they were handwritten (squiggly) |
lefttoright |
Direction of boxes is left to right |
toptobottom |
Direction of boxes is top to bottom (PlantUML default value) |
transparent |
Transparent background |
tne |
Tomorrow night eighties theme. Look here for example. |
cplant |
Cplant theme. Read this for example. |
For needs_graphviz_styles they are:
config name |
description |
|---|---|
default |
Default style used when |
lefttoright |
Direction of boxes is left to right |
toptobottom |
Direction of boxes is top to bottom (default value) |
transparent |
Transparent background |
scale
Added in version 0.5.3.
You can set a scale factor for the final flow chart using the scale option.
:scale: 50 will set width and height to 50% of the original image size.
We also support the numbers between 1 and 300.
Example 11
.. needflow::
   :filter: is_need
   :tags: flow_example
   :link_types: tests, blocks
   :scale: 50

highlight
Added in version 0.5.3.
The :highlight: option takes a single Filter string as a value and
sets the border for each need of the needflow to red if the need also passes the filter string.
Example 12
.. needflow::
   :tags: flow_example
   :link_types: tests, blocks
   :highlight: id in ['spec_flow_002', 'subspec_2'] or type == 'req'
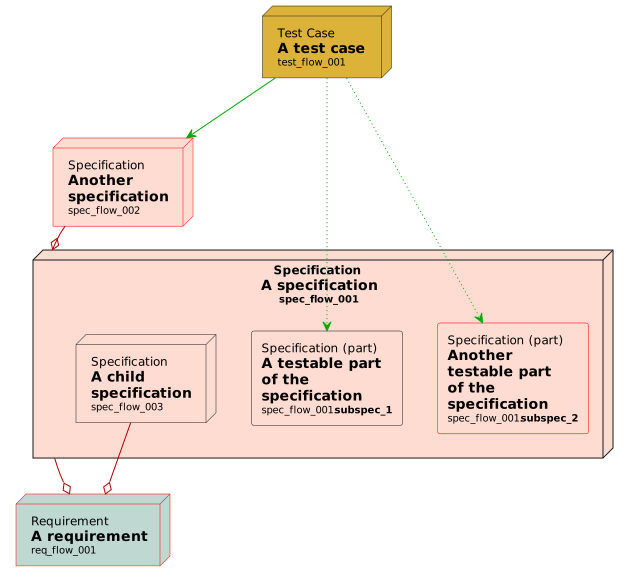
Using Graphviz engine

border_color
Added in version 3.0.0.
The :border_color: allows for setting per need border colors, based on the need data.
The value should be written with the variant syntax, and each return value should be a hex (RGB) color.
Example 13
.. needflow:: Engineering plan to develop a car
   :tags: flow_example
   :link_types: tests, blocks
   :border_color:
      [type == 'req']:FF0000,
      [type == 'spec']:0000FF,
      [type == 'test']:00FF00
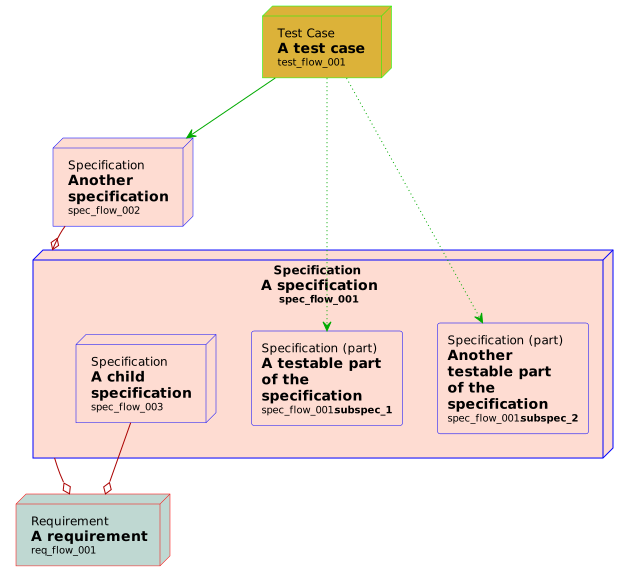
Using Graphviz engine

Engineering plan to develop a car
align
You can set the alignment for the PlantUML image using the align option.
Allowed values are: left, center, right
Example 14
.. needflow::
   :filter: is_need and type == 'spec'
   :tags: flow_example
   :align: center

Using Graphviz engine

debug
Added in version 0.5.2.
If you set the :debug:, we add the generated diagram source after the generated image,
as a line-numbered code block.
Both engines do this, so the option shows PlantUML or Graphviz source
according to which engine drew the diagram.
Helpful to identify reasons why a diagram build may have thrown errors.
Example 15
.. needflow::
   :filter: is_need
   :tags: flow_example
   :link_types: tests, blocks
   :config: lefttoright, handwritten
   :debug:

 1@startuml
 2
 3' Config
 4
 5left to right direction
 6skinparam handwritten true
 7
 8
 9' Nodes definition
10
11node "<size:12>Requirement</size>\n**A requirement**\n<size:10>req_flow_001</size>" as req_flow_001 [[../directives/needflow.html#req_flow_001]] #BFD8D2
12node "<size:12>Specification</size>\n**A specification**\n<size:10>spec_flow_001</size>" as spec_flow_001 [[../directives/needflow.html#spec_flow_001]] #FEDCD2{
13'parts:
14'child needs:
15node "<size:12>Specification</size>\n**A child**\n**specification**\n<size:10>spec_flow_003</size>" as spec_flow_003 [[../directives/needflow.html#spec_flow_003]] #FEDCD2
16}
17node "<size:12>Specification</size>\n**Another**\n**specification**\n<size:10>spec_flow_002</size>" as spec_flow_002 [[../directives/needflow.html#spec_flow_002]] #FEDCD2
18node "<size:12>Test Case</size>\n**A test case**\n<size:10>test_flow_001</size>" as test_flow_001 [[../directives/needflow.html#test_flow_001]] #DCB239
19
20' Connection definition
21
22spec_flow_001 -[#AA0000]-o req_flow_001
23spec_flow_003 -[#AA0000]-o req_flow_001
24spec_flow_002 -[#AA0000]-o spec_flow_001
25test_flow_001 -[#00AA00]-> spec_flow_002
26
27@enduml
Using Graphviz engine

 1digraph needflow {
 2compound=true;
 3graph [
 4  rankdir="LR";
 5]
 6node [
 7  margin="0.21,0.11";
 8]
 9edge [
10  minlen="2";
11]
12
13// node definitions
14"req_flow_001" [label=<<font point-size="12">Requirement</font><br align="left"/><b>A requirement</b><br align="left"/><font point-size="10">req_flow_001</font><br align="left"/>>, tooltip="req_flow_001", href="needflow.html#req_flow_001", target="_top", shape="box3d", style="filled", fillcolor="#BFD8D2"];
15subgraph "cluster_spec_flow_001" {
16  label=<<font point-size="12">Specification</font><br align="center"/><b>A specification</b><br align="center"/><font point-size="10">spec_flow_001</font><br align="center"/>>;
17  tooltip="spec_flow_001";
18  href="needflow.html#spec_flow_001";
19  target="_top";
20  shape="node";
21  style=filled;
22  fillcolor="#FEDCD2";
23
24  "spec_flow_001" [style=invis, width=0, height=0, label=""];
25  // parts:
26  // child needs:
27  "spec_flow_003" [label=<<font point-size="12">Specification</font><br align="left"/><b>A child<br align="left"/>specification</b><br align="left"/><font point-size="10">spec_flow_003</font><br align="left"/>>, tooltip="spec_flow_003", href="needflow.html#spec_flow_003", target="_top", shape="box3d", style="filled", fillcolor="#FEDCD2"];
28
29};
30"spec_flow_002" [label=<<font point-size="12">Specification</font><br align="left"/><b>Another<br align="left"/>specification</b><br align="left"/><font point-size="10">spec_flow_002</font><br align="left"/>>, tooltip="spec_flow_002", href="needflow.html#spec_flow_002", target="_top", shape="box3d", style="filled", fillcolor="#FEDCD2"];
31"test_flow_001" [label=<<font point-size="12">Test Case</font><br align="left"/><b>A test case</b><br align="left"/><font point-size="10">test_flow_001</font><br align="left"/>>, tooltip="test_flow_001", href="needflow.html#test_flow_001", target="_top", shape="box3d", style="filled", fillcolor="#DCB239"];
32
33// edge definitions
34"spec_flow_001" -> "req_flow_001" [color="#AA0000", arrowhead=odiamond, ltail="cluster_spec_flow_001"];
35"spec_flow_003" -> "req_flow_001" [color="#AA0000", arrowhead=odiamond];
36"spec_flow_002" -> "spec_flow_001" [color="#AA0000", arrowhead=odiamond, lhead="cluster_spec_flow_001"];
37"test_flow_001" -> "spec_flow_002" [color="#00AA00", arrowhead=vee];
38}
max_items
Added in version 8.4.0.
The maximum number of needs to show, applied identically by both engines.
We apply the limit after filtering and sorting, so the diagram keeps the first needs it would otherwise have shown,
and tells the reader how many needs it is hiding.
A truncated view says so in the page and emits a needs.max_items warning,
so that a build does not have to be read page by page to find it;
a project that caps deliberately can silence the warning with
suppress_warnings = ["needs.max_items"].
The limit counts the entries the filter returned, which are needs and need parts alike.
Since the limit is applied before the diagram is built,
a link to a dropped need is not drawn at all,
and a need whose parent was dropped is drawn as a root instead of nested.
:max_items: 0 means no limit, also for a project that sets needs_views_max_items.
Without the option, the diagram shows as many needs as that configuration allows.
Example 16
.. needflow::
   :tags: flow_example
   :max_items: 2

Showing the first 2 of 7 needs; refine the filter or set :max_items: (0 for all).
Using Graphviz engine

Showing the first 2 of 7 needs; refine the filter or set :max_items: (0 for all).